Water Softener Salt Tank Level Sensor
This project was originally implemented by @jrbwrjr of Discord - thanks Grandpa Jim!
Purchase VL53L0X on Amazon Amazon
Purchase ESP32 DevBoard on Amazon Amazon
Stepper Bit (very handy when drilling plastics)
Build the device
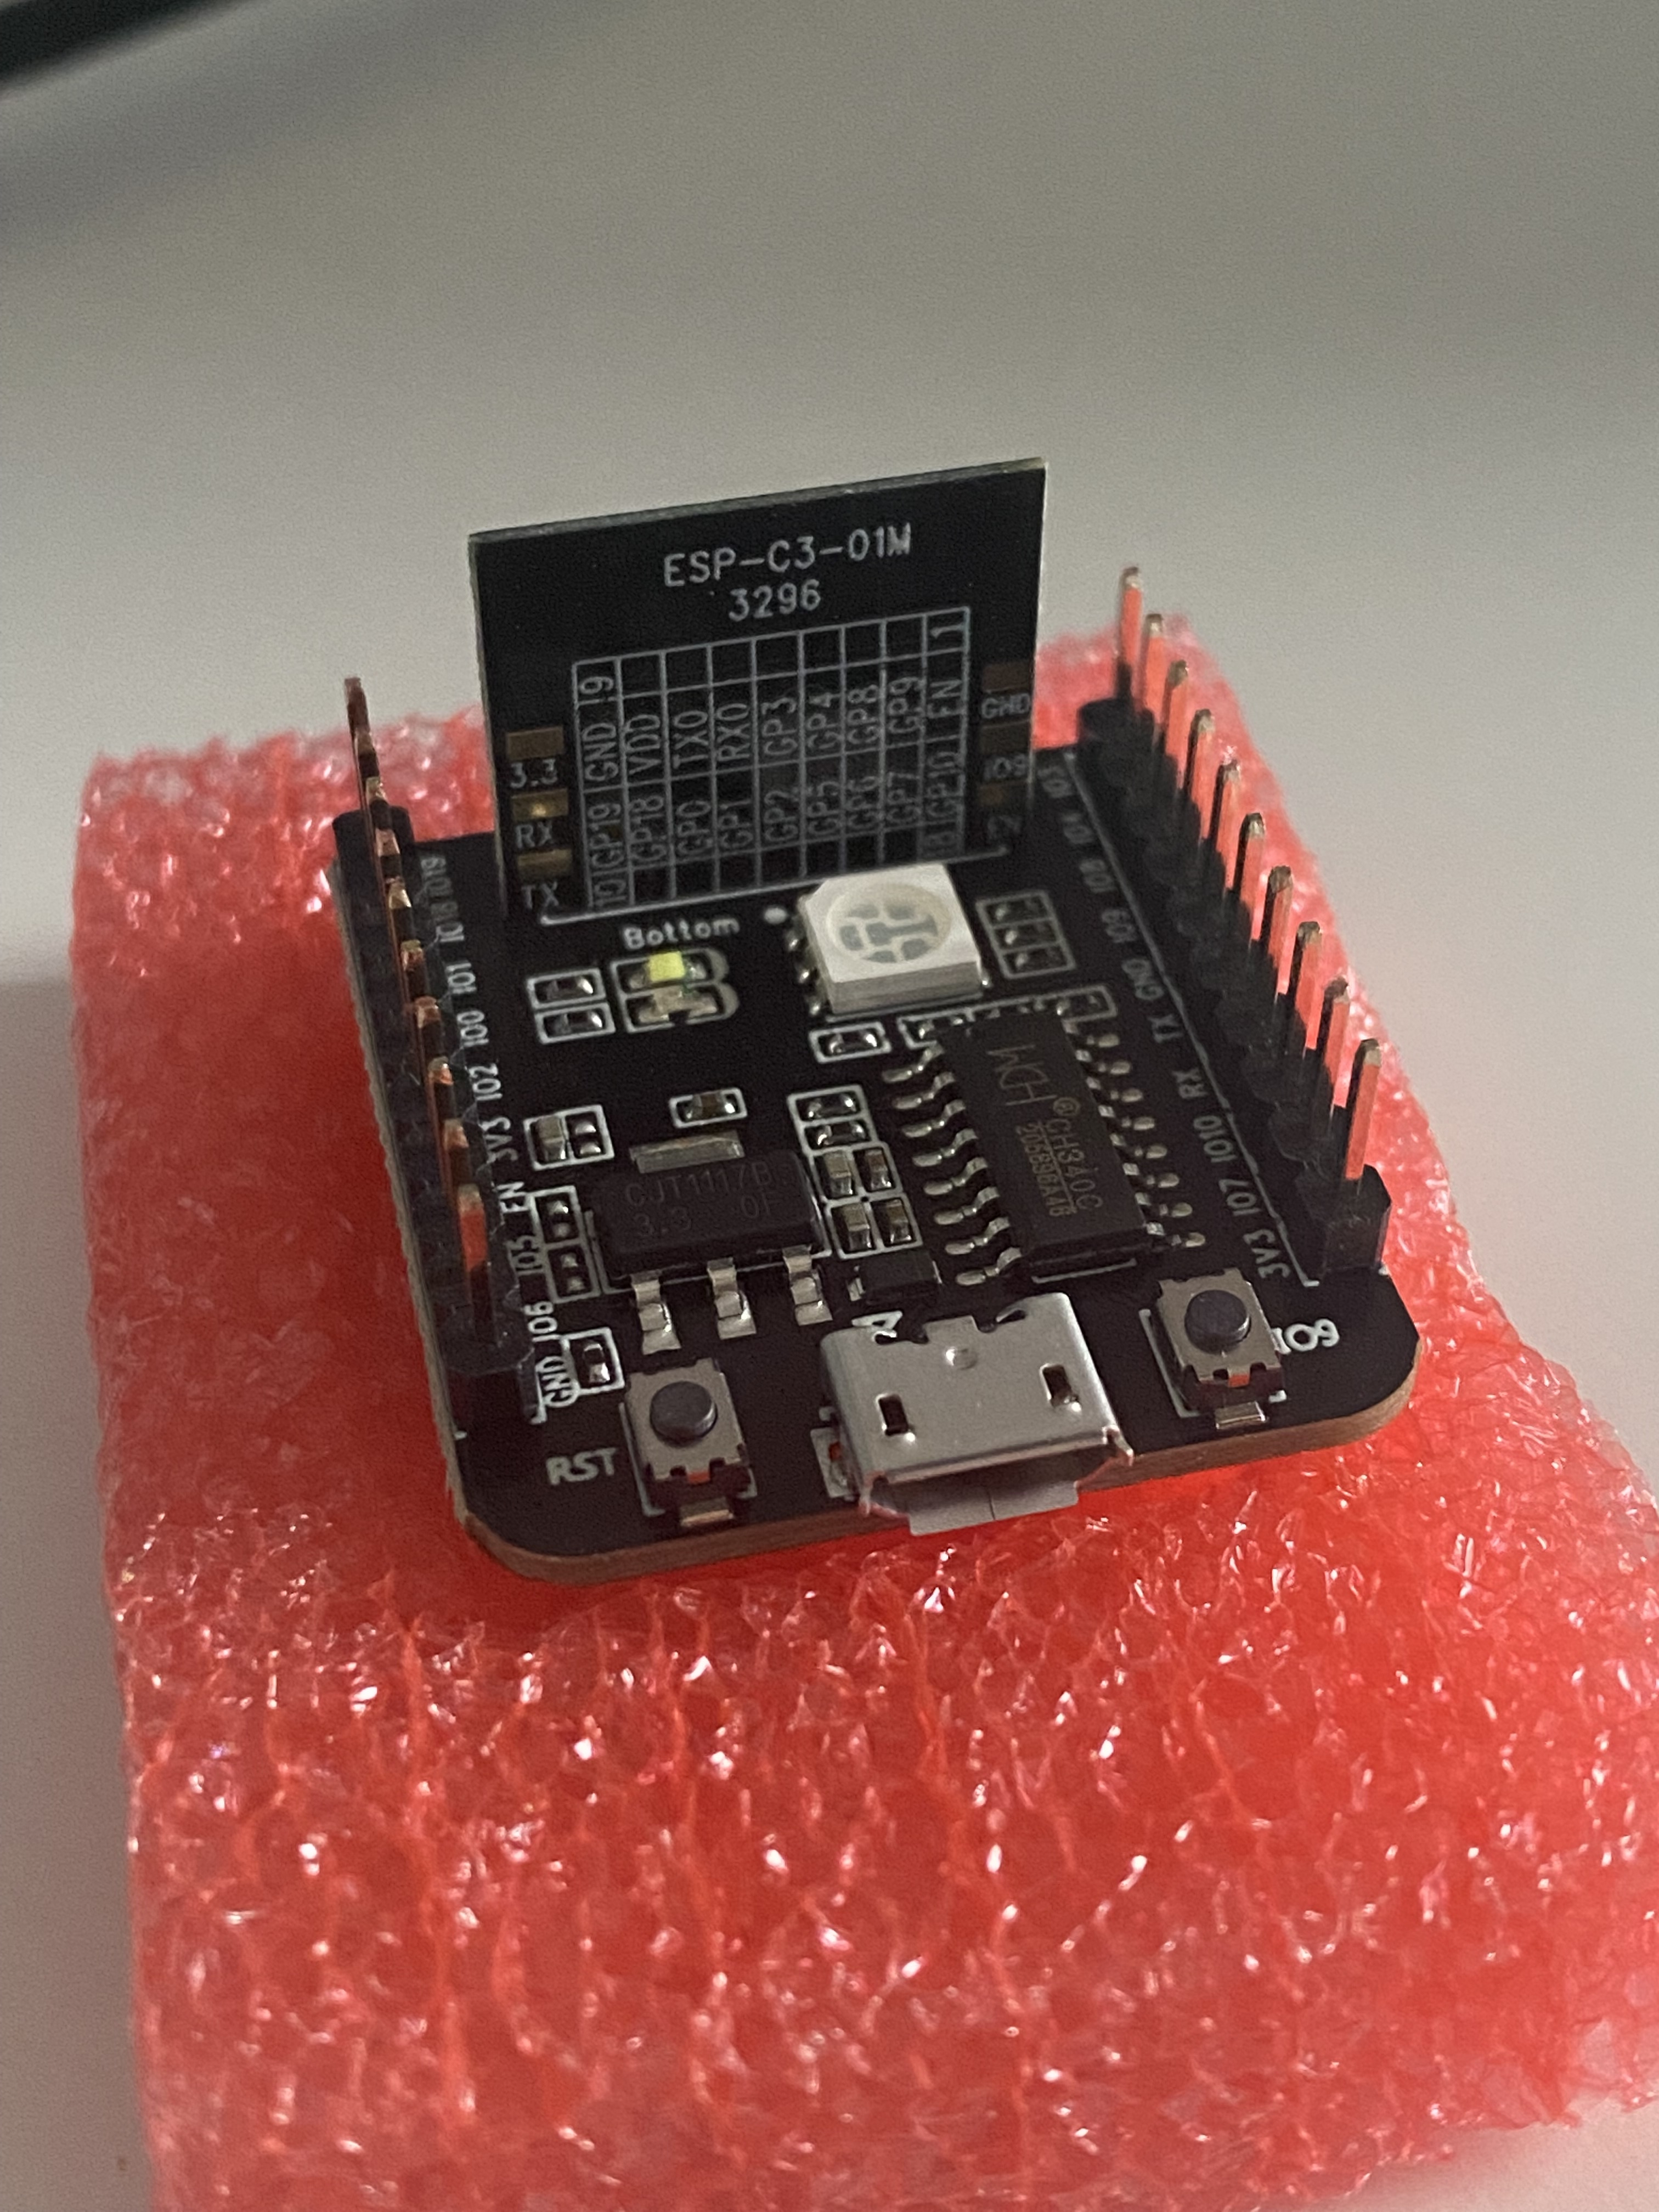
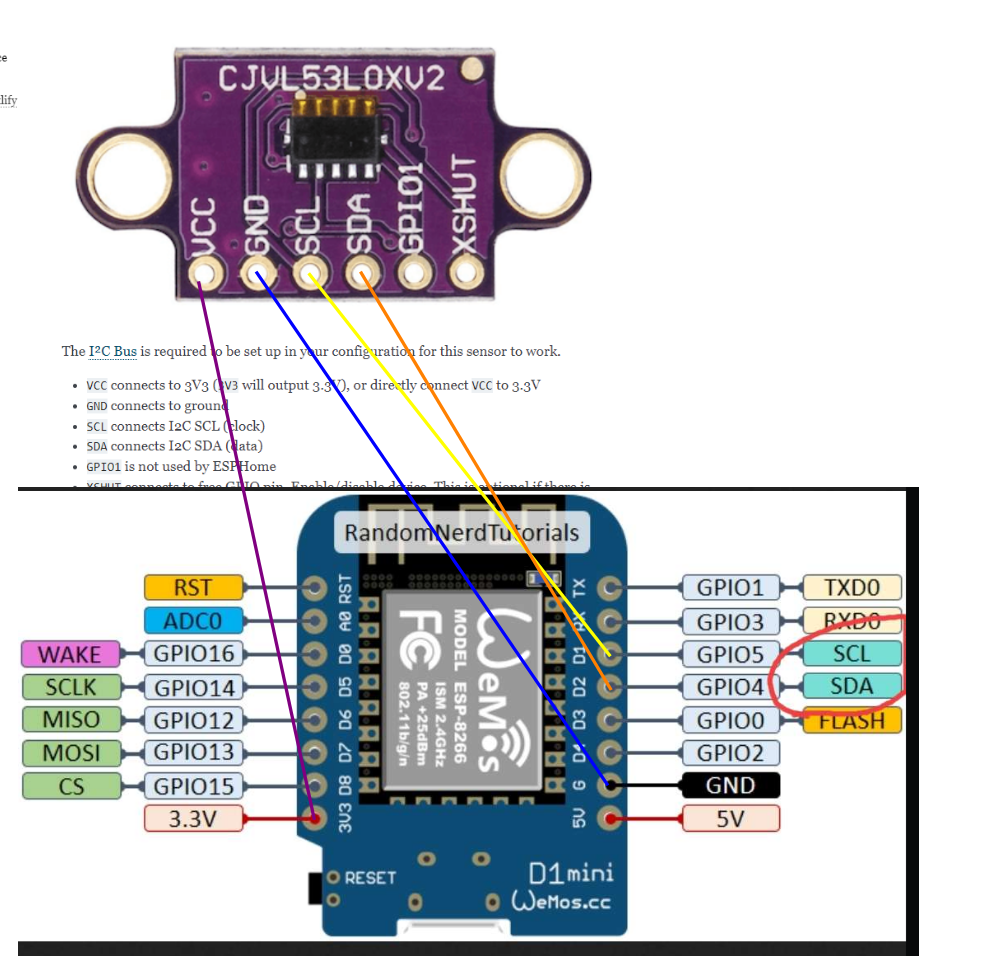
There are lots of ways to built this using various ESP-based boards. I used a C3-based one because it's what I had on hand. If you use something different, you can adjust the GPIO pins accordingly. One such possible setup is using an OG Wemos D1 mini (or clone) and wiring it like this:
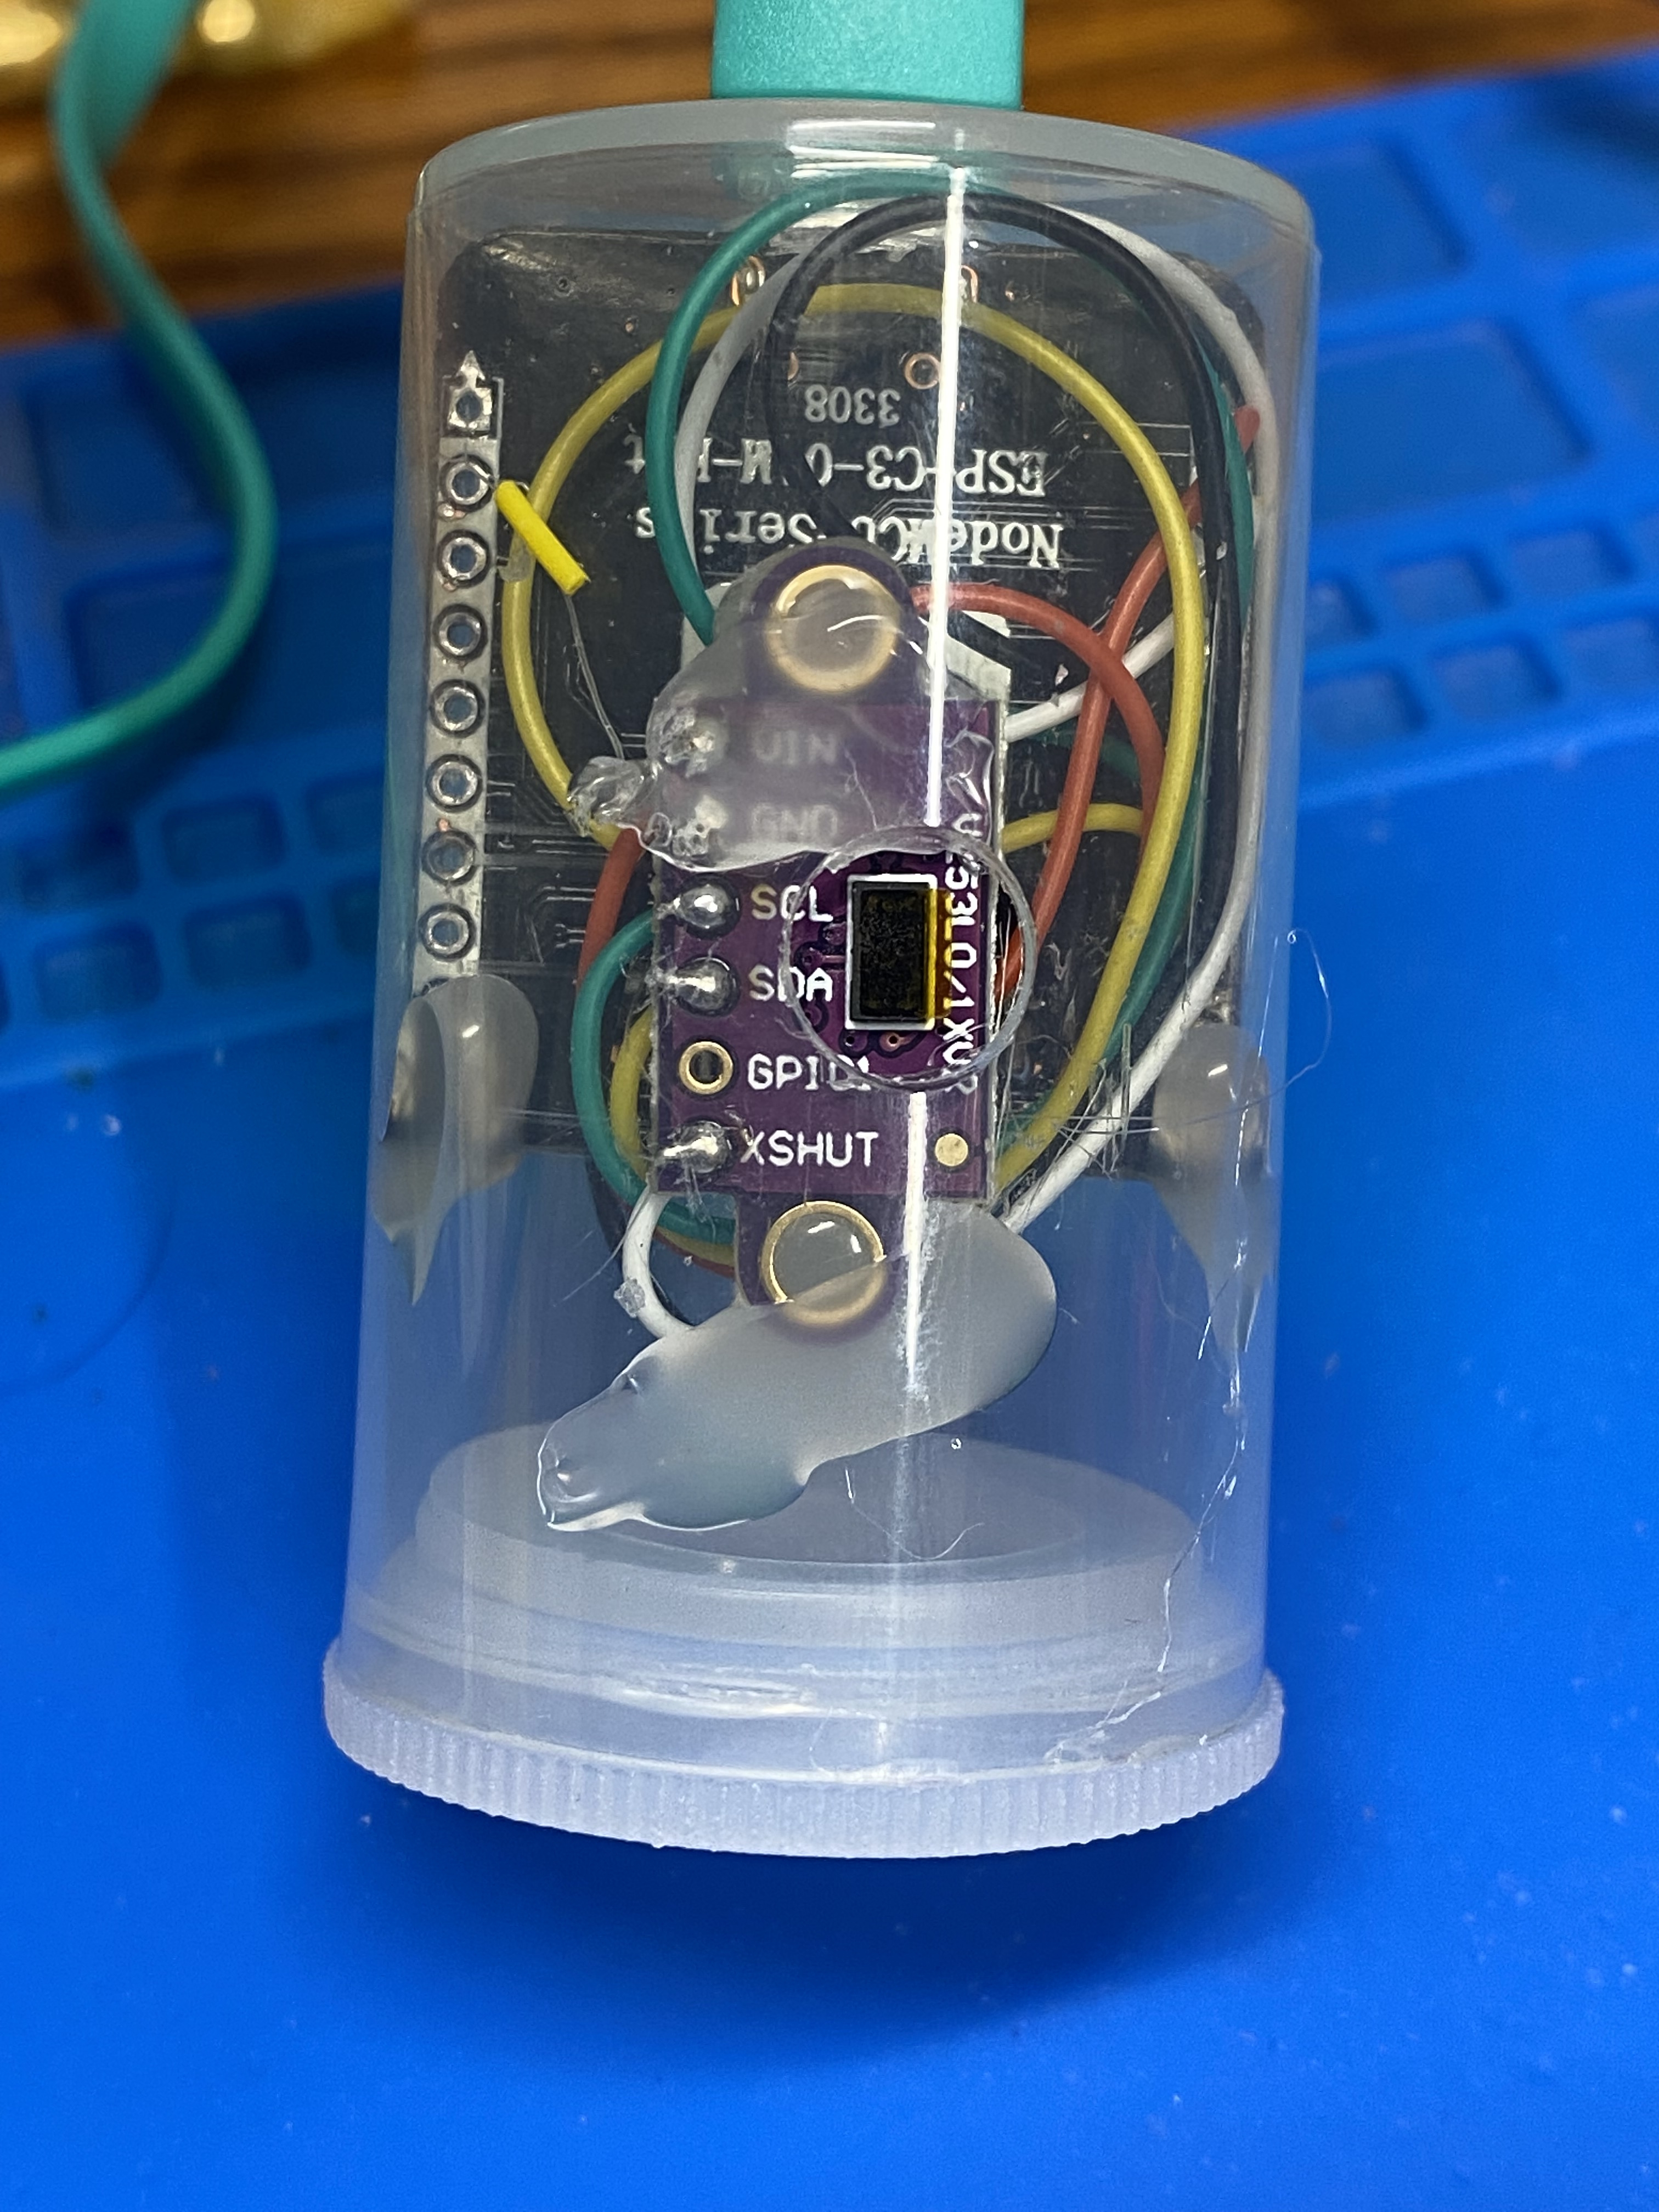
My assembled project:
Setup
Prepare your ESPhome device with a standard, base config. No sensors or anything fancy – just get it working. This can vary somewhat depending on your chosen board + ESPhome install type, and learning how to do it is just part of your ESPHome initiation. If you need help with this, hop on Discord and ask the friendly folks there!
Protip: If you aren’t already using secrets, take a moment to setup your ESPhome secrets.yaml file so that you can reference them in your config below.
Once you have the board working and online in ESPhome, push a new config, adapting the below config as necessary to your specific hardware. I have some LED control “switches” in my config as the devboard I used had an onboard RGB LED, so I am using it to show status.
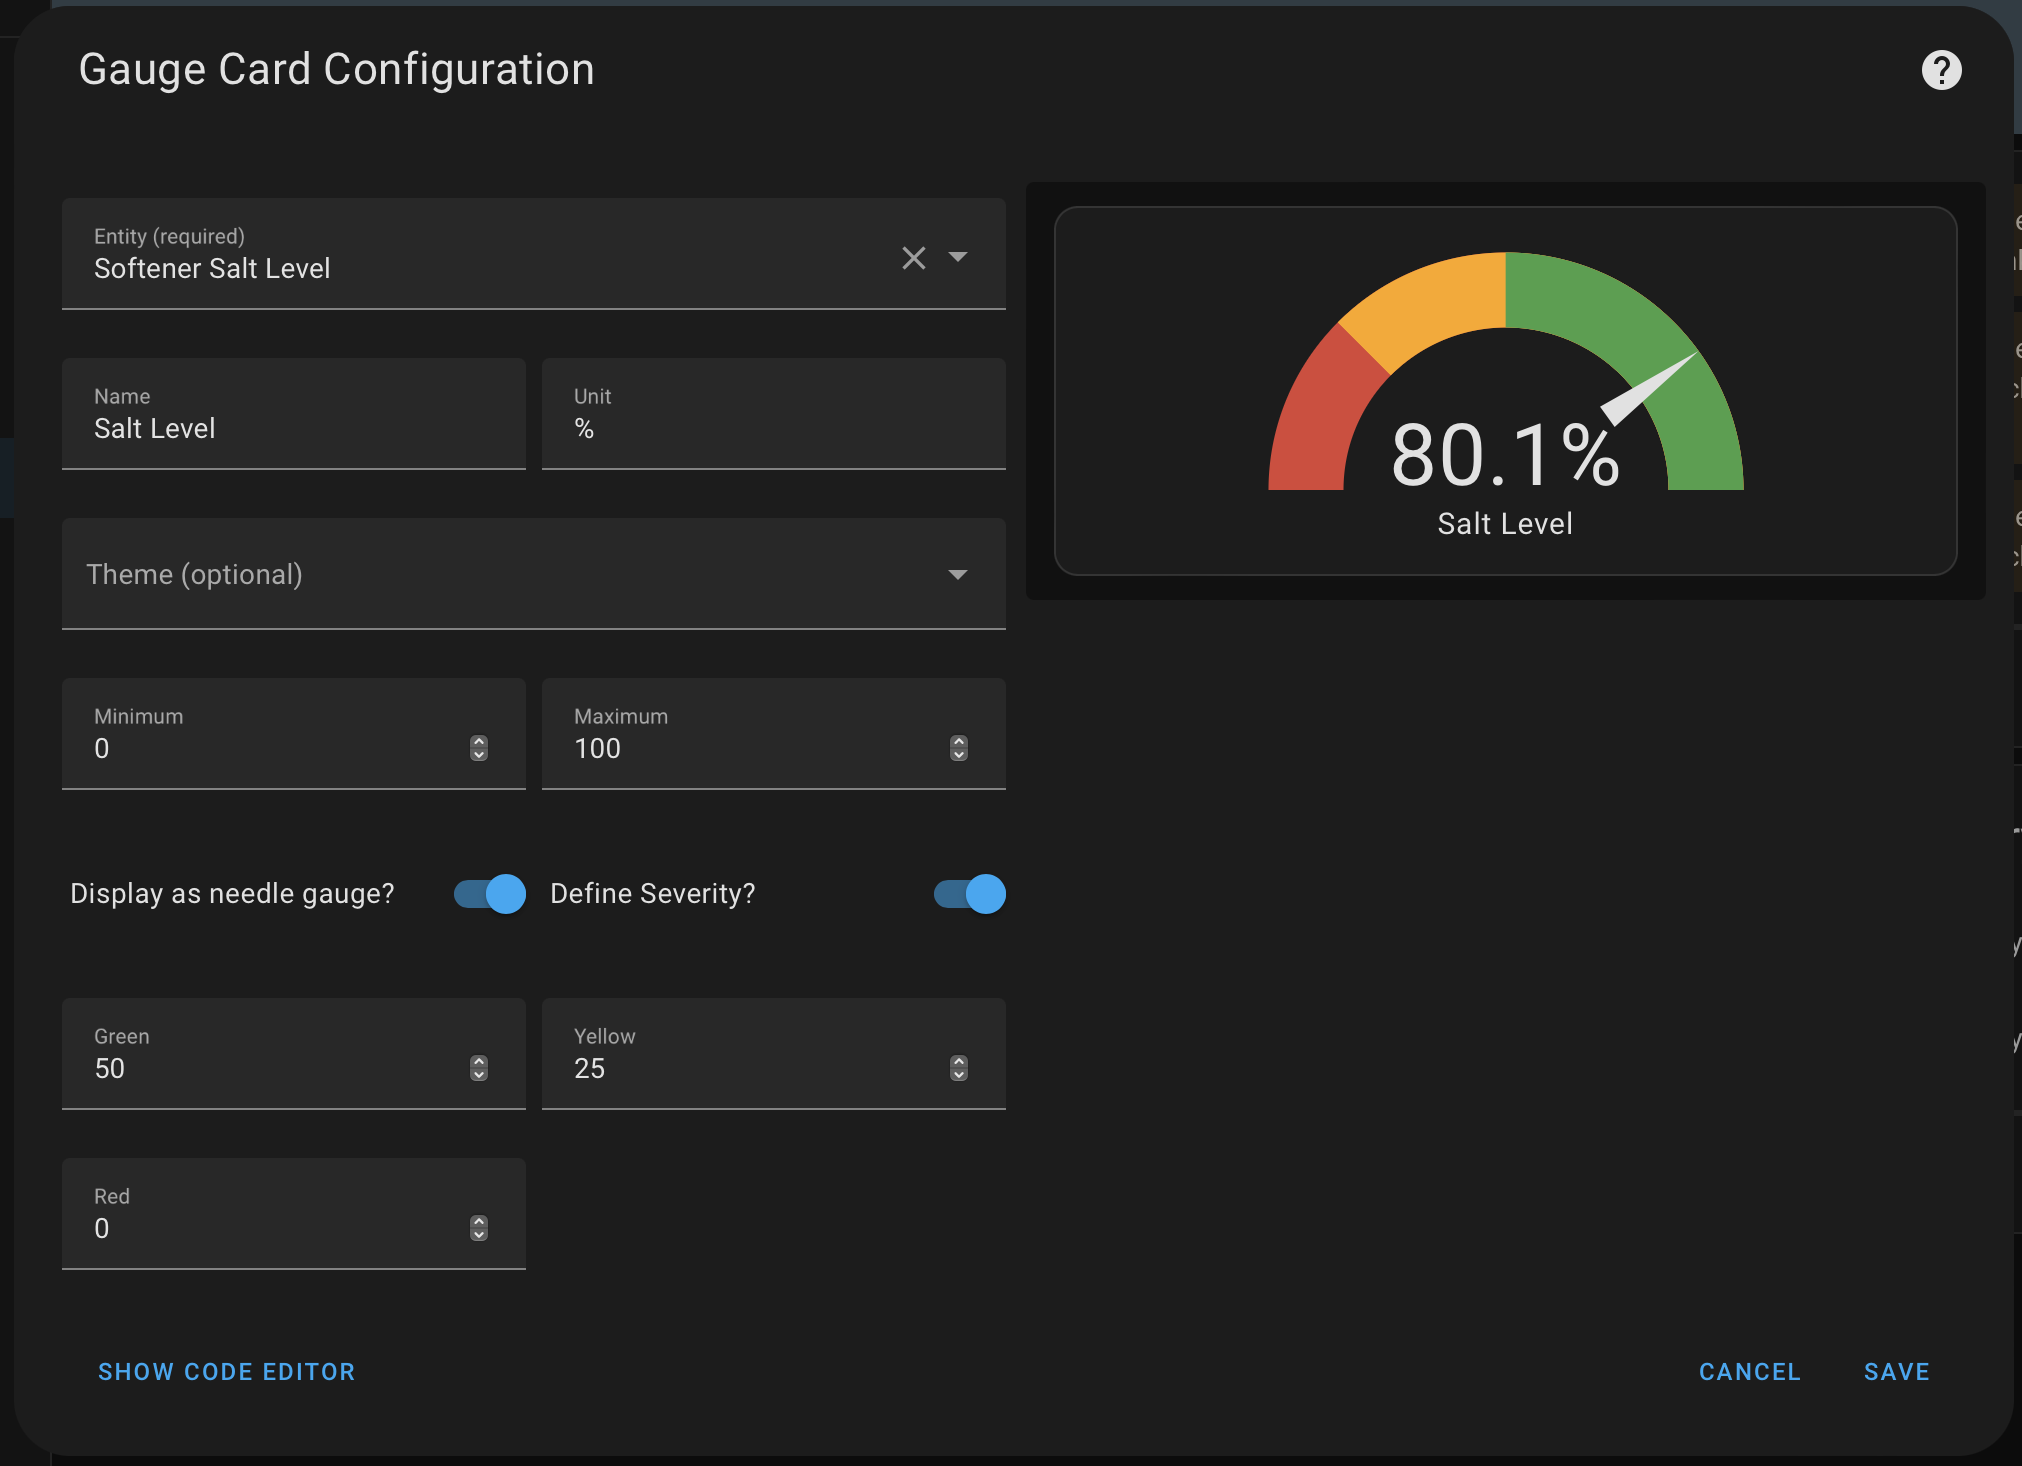
Once the sensor is discovered and populating data in HomeAssistant, you can add a Guage Card to and dashboard to show the level. The "Severity" toggle will let you set ranges:
GPIO Layout
This is what my GPIO layout was for the ESP-C3-01M-DevKit board I used:
| GPIO | Component | Description |
|---|---|---|
| GPIO00 | None | |
| GPIO01 | None | |
| GPIO02 | None | |
| GPIO03 | Red LED | |
| GPIO04 | Blue LED | |
| GPIO05 | Green LED | |
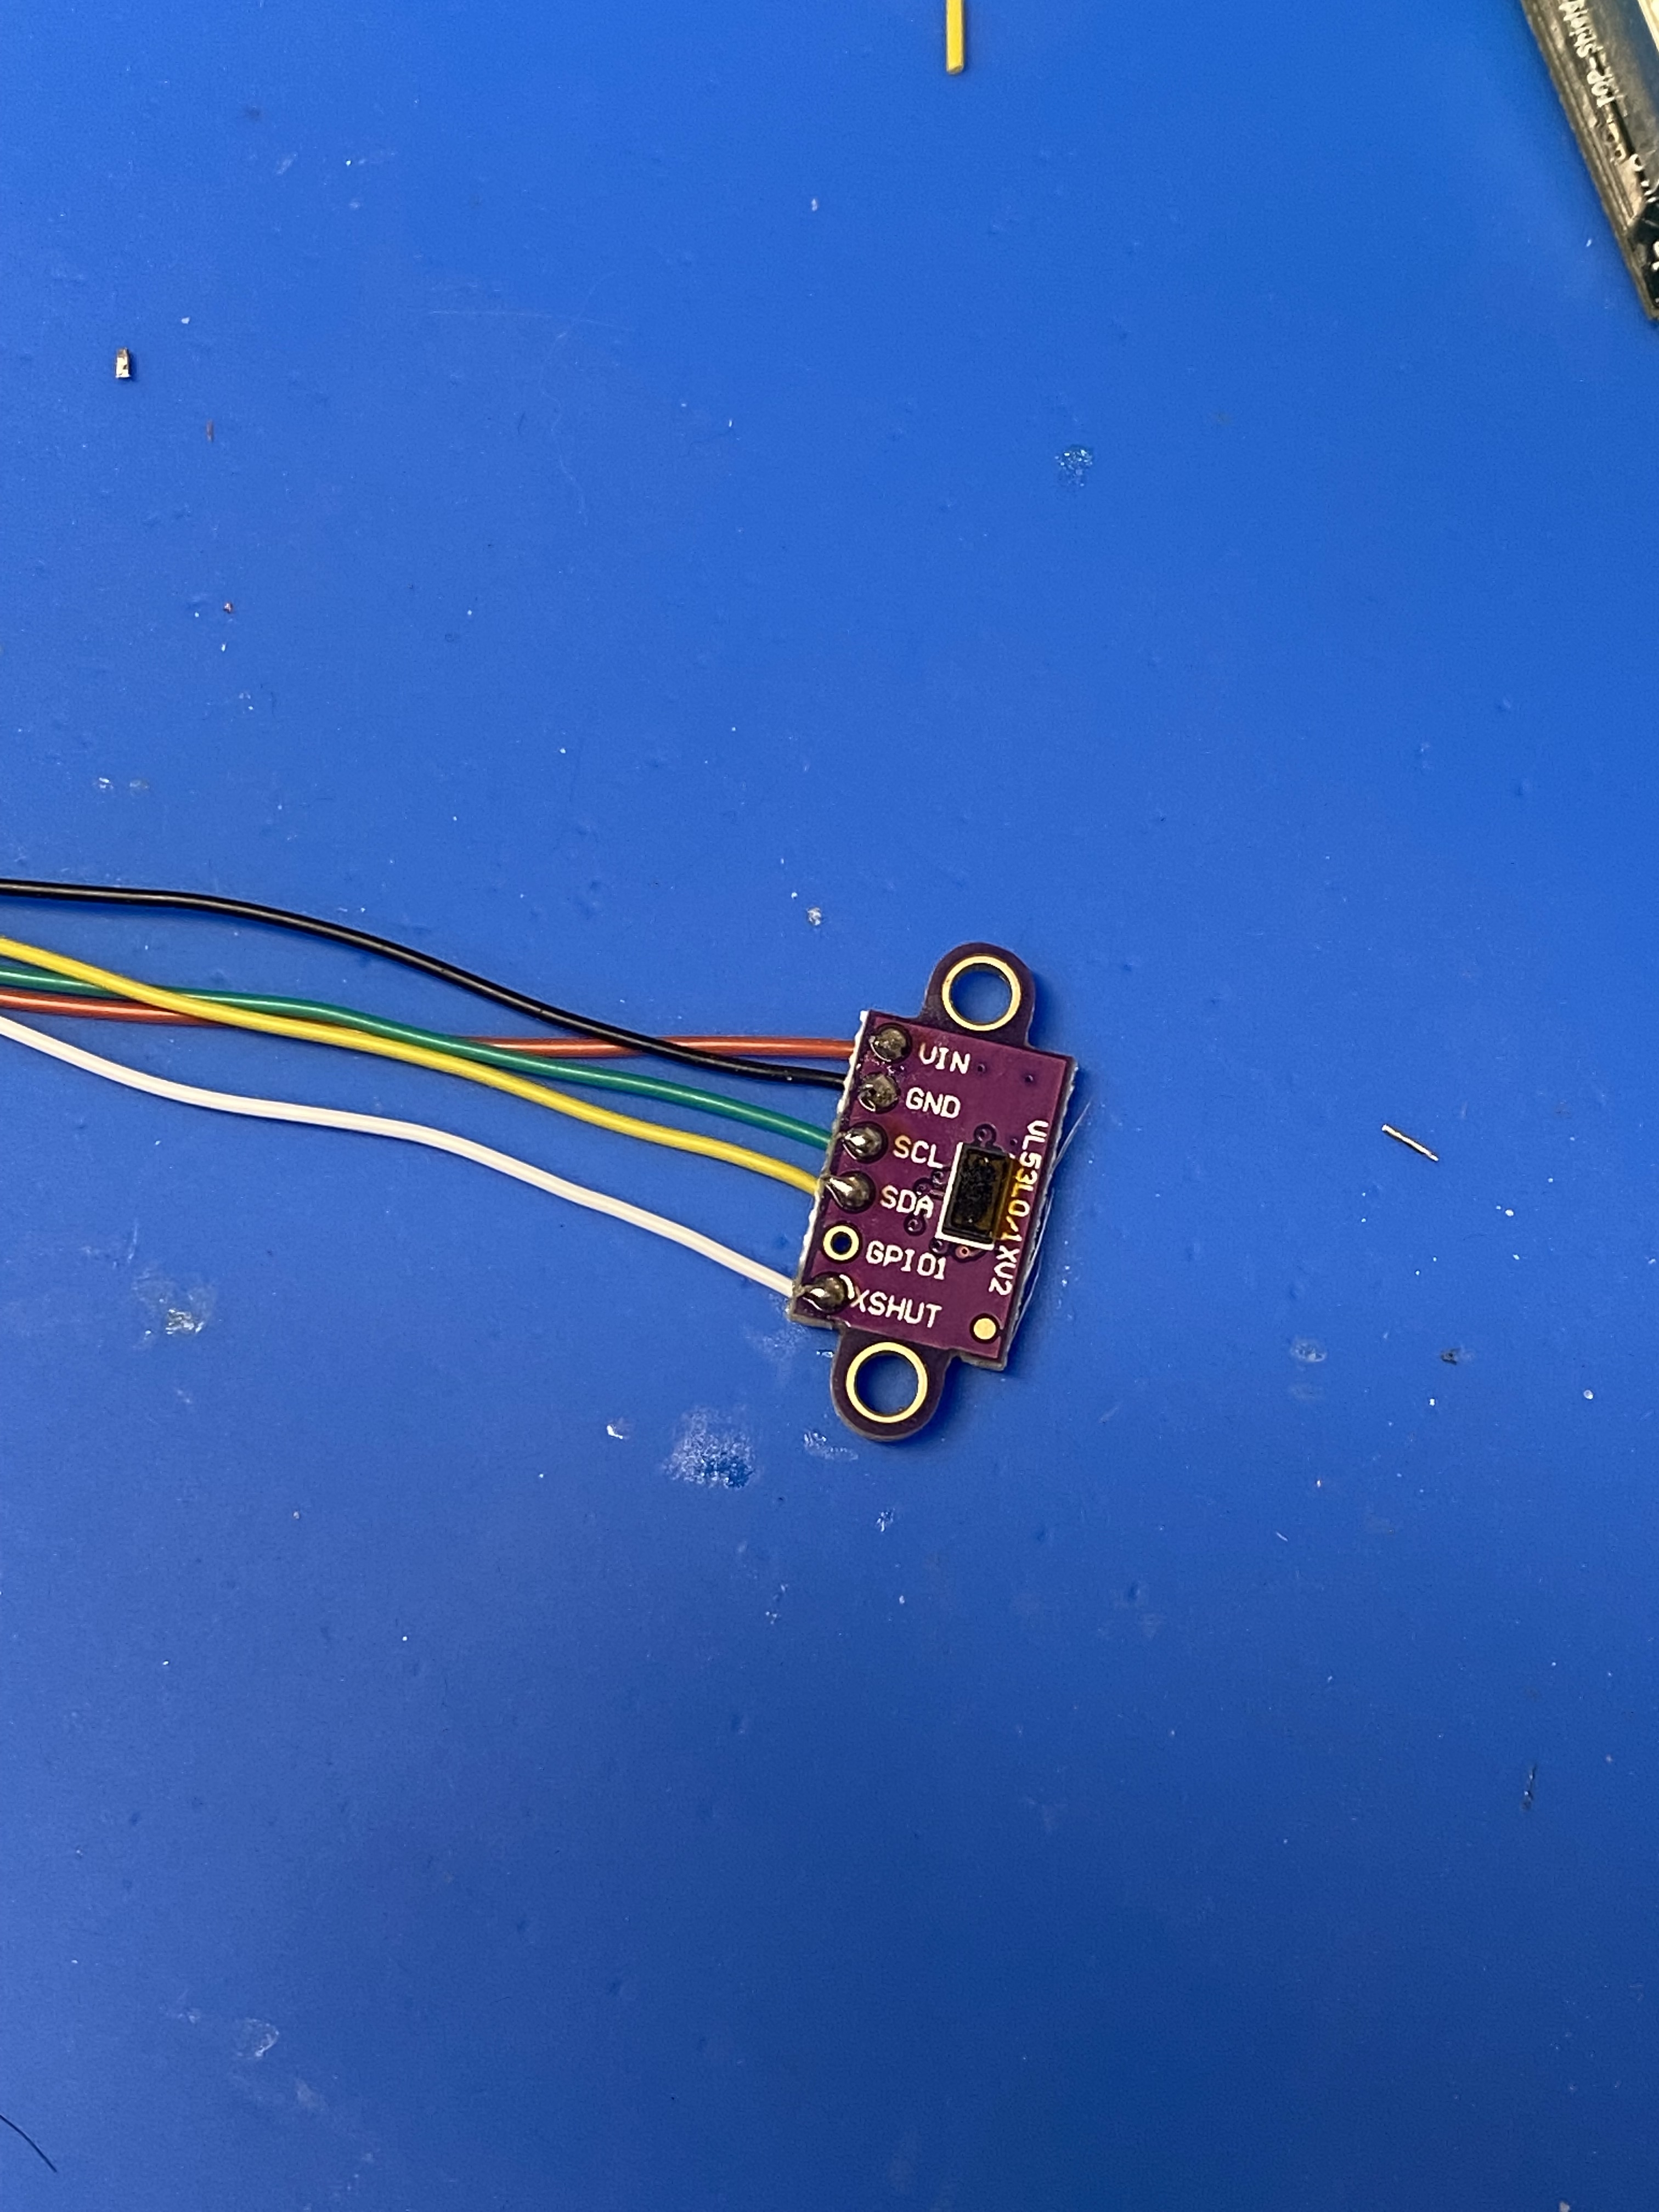
| GPIO07 | VL530X #1 XSHUT | |
| GPIO08 | I2C SDA | |
| GPIO09 | I2C SCL | |
| GPIO10 | None | |
| GPIO12 | None | |
| GPIO13 | None | |
| GPIO14 | None | |
| GPIO15 | None | |
| GPIO16 | None |
ESPHome YAML
esphome:
  name: water-softener

ota:
  platform: esphome
  password: !secret otapassword

preferences:
  flash_write_interval: 240min

esp32:
  board: esp32-c3-devkitm-1
  framework:
    type: arduino

logger:

mqtt:
  broker: !secret mqtt_host
  username: !secret mqtt_user
  password: !secret mqtt_password

wifi:
  ssid: !secret wifi_ssid
  password: !secret wifi_password
  manual_ip:
    static_ip: !secret staticip_watersoftenerc3
    gateway: !secret staticip_gateway
    subnet: !secret staticip_subnet
    dns1: !secret staticip_dns1

  ap:
    ssid: "Water-Softener Fallback Hotspot"
    password: !secret fallback_password

captive_portal:

i2c:
  sda: GPIO8
  scl: GPIO9

sensor:
  - platform: vl53l0x
    name: "Softener Salt Level"
    id: tof_softener_salt_level
    address: 0x29
    # the enable_pin is for the XSHUT on the vl53l0x
    # allowing multiple on one i2c bus
    # Eliminate the line below if only using one.
    enable_pin: GPIO7
    update_interval: 12s
    filters:
      #- offset: -0.01
      - median
      # linear calibration – where .2m from the sensor is 100% fill level
      # and .79 meters is your 0%/empty level. Take your own measurements once
      # the sensor is in place and adjust.
      - calibrate_linear:
        - 0.790 -> 0
        - 0.537 -> 44
        - 0.412 -> 64
        - 0.308 -> 82
        - 0.200 -> 100
    unit_of_measurement: "%"
    accuracy_decimals: 1
    on_value_range:
    - below: .25
      then:
        - switch.turn_on: red
    - above: .25
      below: .50
      then:
        - switch.turn_on: blue
    - above: .50
      then:
        - switch.turn_on: green

switch:
  - platform: gpio
    name: "Red"
    id: red
    interlock: &interlock_group [red, green, blue]
    pin: GPIO3
  - platform: gpio
    name: "Green"
    id: green
    interlock: *interlock_group
    pin: GPIO4
  - platform: gpio
    name: "Blue"
    id: blue
    interlock: *interlock_group
    pin: GPIO5
*Note: This particular devboard has an onboard RGB LED, so I used it for a visual status indicator. Without that, the ESPHome config looks much more simple:
Simplified ESPHome Config:
esphome:
  name: water-softener

ota:
  platform: esphome
  password: !secret otapassword

preferences:
  flash_write_interval: 240min

esp32:
  board: esp32-c3-devkitm-1
  framework:
    type: arduino

logger:

mqtt:
  broker: !secret mqtt_host
  username: !secret mqtt_user
  password: !secret mqtt_password

wifi:
  ssid: !secret wifi_ssid
  password: !secret wifi_password
  manual_ip:
    static_ip: !secret staticip_watersoftenerc3
    gateway: !secret staticip_gateway
    subnet: !secret staticip_subnet
    dns1: !secret staticip_dns1

  ap:
    ssid: "Water-Softener Fallback Hotspot"
    password: !secret fallback_password

captive_portal:

i2c:
  sda: GPIO8
  scl: GPIO9

sensor:
  - platform: vl53l0x
    name: "Softener Salt Level"
    id: tof_softener_salt_level
    address: 0x29
    # the enable_pin is for the XSHUT on the vl53l0x
    # allowing multiple on one i2c bus
    # Eliminate the line below if only using one.
    enable_pin: GPIO7
    update_interval: 12s
    filters:
      #- offset: -0.01
      - median
      # linear calibration – where .2m from the sensor is 100% fill level
      # and .79 meters is your 0%/empty level. Take your own measurements once
      # the sensor is in place and adjust.
      - calibrate_linear:
        - 0.790 -> 0
        - 0.537 -> 44
        - 0.412 -> 64
        - 0.308 -> 82
        - 0.200 -> 100
    unit_of_measurement: "%"
    accuracy_decimals: 1
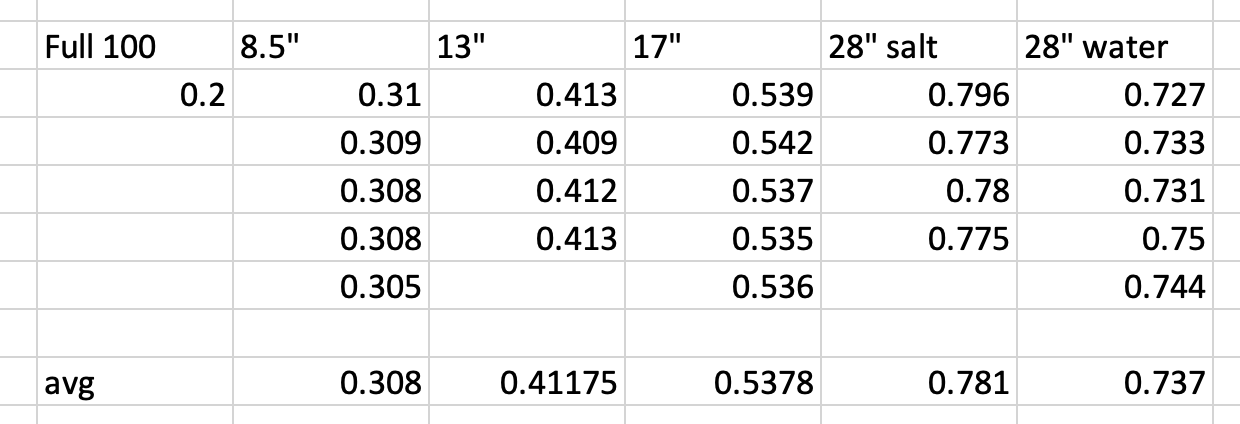
Calibrating the range
I found the sensor to be pretty accurate against salt - but a bit more volatile against just a pool of water in the bottom of the brine tank while I was testing. So, to get my base calibration points I added JUST enough salt in the bottom to bring it above the water line. Measure the distance to top of the tank (28" in my case). Measure from the top of the tank to where you want your 100% fill to be (8.5" for me) and note both of these values somewhere. Open up the device "Logs" in ESPhome and monitor the salt readings. I took five concurrent readings and averaged them to get my 'zero' measurement in meters. Add another bag of salt, reinstall the lid and take five more measurements, average them and note the average along with the measurement from the top of the tank to your new salt level. Repeat this until you reach your max fill. I ended up with a worksheet like this, which I then translated to percentages based on the ~20" of salt height.