
The Extensive Smart Light Comparison of 2019 | Teardowns included at the End

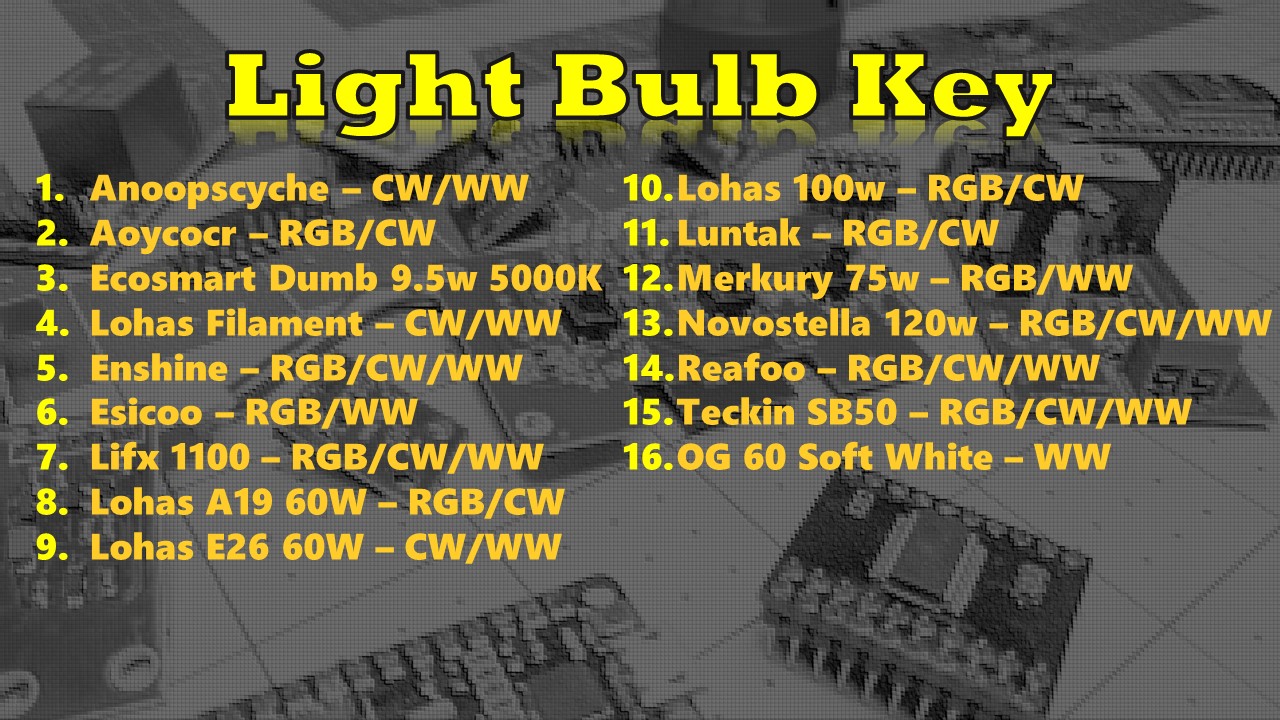
We spent quite a bit of time setting up 15+ bulbs, photographing, videoing them and testing out each channel with LUX sensors.  All the data and video has been compiled for you to make your own decisions, although I do tell you which bulb is my favorite based on various factors/features.

Bulbs
Lohas A19 60W RGBW
Lohas A19 E26 CW/WW
Lohas A21 100W RGBW
Edison Tunable E26 CW/WW
Novostella 120W A19
Reafoo E26
Anoop 60W CW/WW
Aoycocr A19 750lm
Enshine A19 60W
Esicoo 60W
Luntak E26 60W
Merkury A21 75W
Teckin SB50
Lifx A19 1100lm

Google Spreadsheet of Smart Lights

-=-=-=-Get the Products We Use/Recommend-=-=-=- Amazon US - https://amzn.to/2YZNDeO
Amazon UK - https://amzn.to/2TnG2R4
Amazon CA - https://amzn.to/2HchPZe

-=-=-=-Come chat with us!-=-=-=- Discord - https://discord.gg/bNtTF2v
Patreon - https://www.patreon.com/digiblurDIY

Links to products provided through the Amazon Affiliate program.

First you may ask why do we need this if we can currently do these with Tuya Convert?  Pay attention to that word "currently".  You can never beat the tried and true method of connecting up those RX/TX lines via serial to flash your ESP82xx devices.  99.9% of the time it just works!  If you have any issues or firmware corruption it is stupid simple to just recover your device. 

Luckily the quite awesome performance to cost ratio bulbs that Lohas provides they also have the RX/TX pins exposed for us right on top under the diffuser.  That's quite rare in a bulb, especially in one of my favorite bulbs!  The only issue I've found is the 3v3 pin does not work!  But no fear!  It is easy to solder to the 3v3 pin on the flash memory chip. 

First apply a bit of flux to each pad you will be soldering to then apply a small bulb of solder to the pads. 

Next take a dupont jumper wire and cut off the ends.  Apply a small amount of flux and then tin them with solder. 

Then simply apply heat to the pad and pre-tinned wire and it pulls right together.  The dupont wire flexes easily as well to prevent the pad from being ripped off the bulb.  Take your time and do not use to much heat!  I've attached some pictures for reference of where the memory pin is to provide power. 

4 Pack Lohas RGBW Light Bulbs

DO NOT APPLY MAINS POWER TO THE BULB WHILE YOU HAVE THESE WIRES CONNECTED!

Tearing down a unique RGB night light switch from top to bottom.  We show the investigative work of figuring out the pins for flashing and usage of the switch.   Join the fun and remove the cloud dependency from your switches making them yours!

RGB Smart Switch
Alternate Switch

Volt Meter
Dupont Jumpers
CH340G Usb to Serial

RGB Switch Tasmota Template

{"NAME":"RGB Switch","GPIO":\[30,255,32,10,39,38,0,0,31,9,37,21,255\],"FLAG":0,"BASE":18}  

Addtl Links
Tasmota - https://github.com/arendst/Sonoff-Tasmota
NodeMCU Pyflasher - https://github.com/marcelstoer/nodemcu-pyflasher

Devices/Toys we use - https://amzn.to/2YZNDeO
Amazon UK Link - https://amzn.to/2TnG2R4
Amazon CA Link - https://amzn.to/2HchPZe
Come chat with us!
Discord - https://discord.gg/bNtTF2v
Patreon - https://www.patreon.com/digiblurDIY

Review of the Argus Eco - Wire Free Solar Powered Camera.  Put it Anywhere!

Congrats to Mike S on his win of the giveaway on Discord/Facebook.  Be sure to read his review of the camera here -  Mike S's review of the Argus Eco (PDF file)

Argus Eco(US)
Argus Eco(UK)

Direct Reolink Argus Eco Link
Additional 8% off coupon code from Reolink - ytbreo8offustravis

Devices/Toys we use
Amazon UK Link
Amazon CA Link

Come chat with us!
Discord
Patreon

The ShellyEM is an all in one power monitoring solution for monitoring two circuits up to 120A.

Buy a ShellyEM

Products I use and recommend
Amazon UK Link
Amazon CA Link

Come chat with us!
Discord - https://discord.gg/bNtTF2v
Patreon - https://www.patreon.com/digiblurDIY

Sample Home Assistant Sensor via MQTT

  - platform: mqtt
name: "ShellyEM1 Watts"
state_topic: "shellies/shellyem-B9E17C/emeter/0/power"
qos: 0
unit_of_measurement : "W"
icon: mdi:flash-circle
- platform: mqtt
name: "ShellyEM1 Volts"
state_topic: "shellies/shellyem-B9E17C/emeter/0/voltage"
qos: 0
unit_of_measurement : "V"
icon: mdi:flash-circle
#    availability_topic: "shellies/shellyem-B9E17C/online"
#    payload_available: "Online"
#    payload_not_available: "Offline"

Easy to deploy and reliable sensors for automations on doors, cabinets, freezers, toilet seats (we know who!), etc, check out the Wyze Sense pack.  By popular demand after the live stream we are doing a quick and easy step by step setup with Home Assistant.  This was tested on a Raspberry Pi 4 (which runs pretty quick!) but you can install this on many device setup types, such as unRaid, docker, etc.

Wyze Sense Pack w/ Camera
Wyze Sense Pack Only

Raspberry Pi 4 Kit

Addtl Links
Wyze Component - https://github.com/kevinvincent/ha-wyzesense
HACS Install - https://custom-components.github.io/hacs/installation/manual/
DrZzs Install of HACS - https://www.youtube.com/watch?v=aJTTCAvzpIU

Products I use and recommend on Amazon

Come chat with us!
Discord - https://discord.gg/bNtTF2v
Patreon - https://www.patreon.com/digiblurDIY

unRaid hidraw<x> Passthrough

This is for folks running separate docker containers and not using the Hassio Supervisor

Plug in the Waze USB receiver, log into the unRaid GUI and check the system log to see the number that hidraw installed as. (click the graphic below for a larger view)

Go to the Docker tab, find your "home-assistant" container and click edit.  Click "+Add another Path, Port..." button.

Click Save, then Done, and the Docker container will be stop and updated with the new pass through.  Follow through with adding the hidraw<x> number you had to the configuration.yaml.  That's it!

Tuya Convert got you down?  Still looking for some devices that don't require soldering to flash your Tasmota, ESPHome, etc open source firmware?  We are checking out a few devices that can be flashed with the open pin headers.  No soldering!  If you have any devices to add to the list be sure to comment down below.  They will get added along with pictures of the pin headers on this Blog post.  Let's build the list and make all of our devices ours with pure local control!

Solderless Devices
Zemismart - 1,2, or 3 Switch

They refer to them as gangs, but there are three models based on how many switches you want. They are clickie style switches and fit in a standard US 1 gang width box.  Remove the 4 screws on the back and you'll see the pins all right there.  IO0 is the GPIO 0 pin.

Sonoff iFan03

The button is GPIO0 - hold the button while applying power for a few seconds, just like the Sonoff Basic

Etekcity Switch 2 Way

Etekcity Switch 3 Way

Martin Jerry Switch 2 Way

Martin Jerry Dimmer

Uses the digiDIM forked bin from here for the MJ-SD01 Dimmer

Acenx Dimmer

Same as the MJ Dimmer above - just a different faceplate

Etekcity Smart Plug

Shelly 1

Shelly 1(Non US)  

Shelly 2.5
Shelly 2.5(Non US)

Sonoff Basic

Smart Socket

Process shown in video above

Parts/Items in the Video
CH340G USB Flasher
Jumper Wires

Addt'l Links
Tasmota - https://github.com/arendst/Sonoff-Tasmota
NodeMCU Pyflasher - https://github.com/marcelstoer/nodemcu-pyflasher

Products I use and recommend on Amazon

Come chat with us!
Discord - https://discord.gg/bNtTF2v
Patreon - https://www.patreon.com/digiblurDIY