
***UPDATE 05/28/2023 - LibreTuya renamed to LibreTiny
Remember the days of Tuya-Convert where you could obtain a Tuya based Wi-Fi Smart device, run a quick exploit via a Raspberry-Pi and load your own copy of Tasmota or ESPHome firmware right on the device? Things were patched unfortunately and then later the chipsets were changed to a Beken based chipset that wouldn't run Tasmota at all. So we resorted to chip swapping with hot air guns, soldering etc to get our favorite local non-cloud firmware on the device. Things are now going full circle again where we can load firmware on the Beken chipsets with an over the air exploit called tuya-cloudcutter It is such an awesome process and down right addictive!. Then the bigger accomplishment is the LibreTiny project has it all working with ESPHome! No additional firmware to learn especially for the ESPHome folks. It all integrates with Home Assistant like any other ESPHome device does.
What do you need?
First a device that is Beken based and on the list of exploitable devices with tuya-cloudcutter (more are being added all the time!). In this example I'm using the Globe Motion NightLight Plug Second a laptop, NUC, PC, etc or Raspberry-Pi to run the exploit and also load the ESPHome firmware.
The instructions below are based on using a Raspberry-Pi, if you are using a different computer you will need to adapt by using a different OS flavor but the concept is all the same. If you are more of a full-video type of person and want the complete walk through view the video below.
Full Video
Read more 👉
Building the Raspberry Pi Image
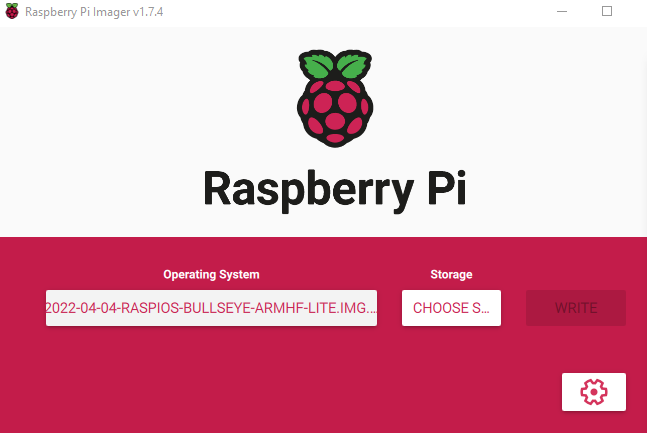
- Download the Raspberry Pi Imager - https://www.raspberrypi.com/software/
- Download the 2022-04-04 Raspberry Pi OS - https://downloads.raspberrypi.org/raspios_lite_armhf/images/raspios_lite_armhf-2022-04-07/2022-04-04-raspios-bullseye-armhf-lite.img.xz
Open the Raspberry Pi Imager - Select Choose OS - Use Custom and browse to the 2022-04-04 copy of RPI you just downloaded above. Choose your SD card as the Storage.
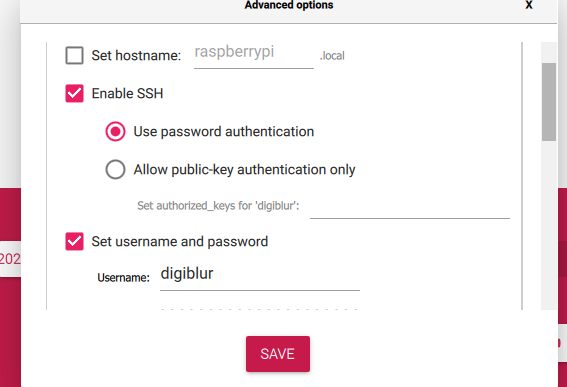
Don't forget to select the gear icon and enable SSH and set your username password
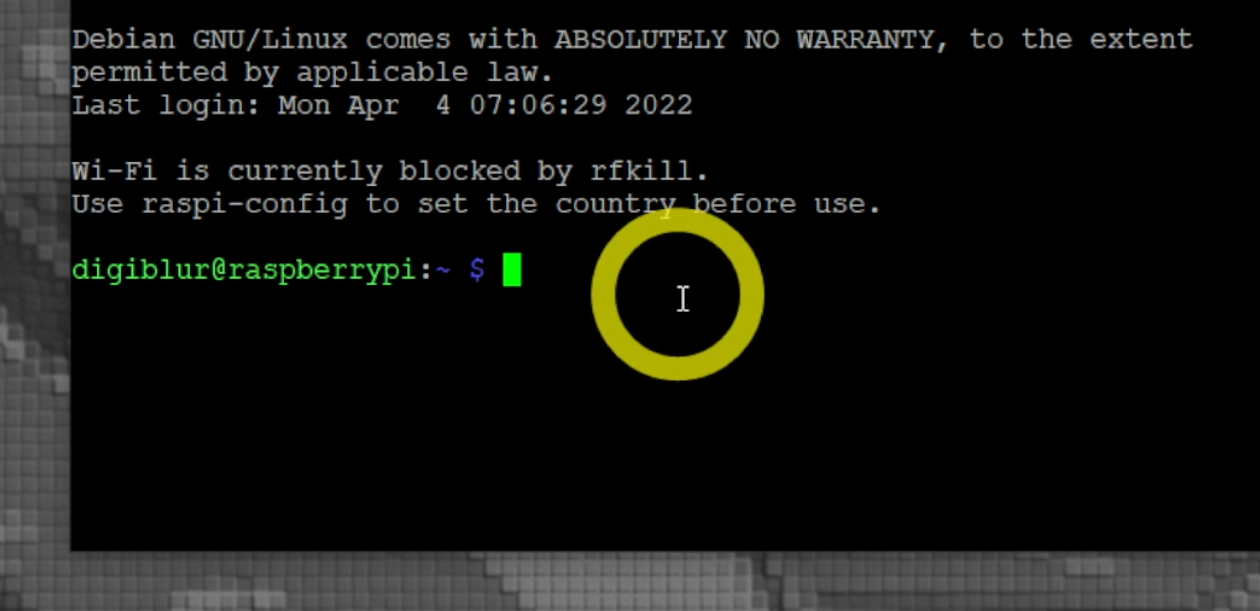
- Write the image to the card and then place it in the Raspberry Pi. Connect the RPI to Ethernet and power it up. Wait a few minutes as the first boot can take some time. Open an SSH terminal such as Putty to the IP address of the RPI. You should see a note about Wi-Fi being unavailable.
Run
sudo raspi-configgo to Localisation Options -> WLAN Country and set your country. Hit Finish and select Yes to Reboot. SSH back into the RPI do the following steps to prepare for Tuya-CloudCutterInstall Network Manager (only reboot once all files are in place)
sudo apt update && sudo apt install network-managersudo nano /etc/dhcpcd.confthen add linedenyinterfaces wlan0sudo nano /etc/NetworkManager/NetworkManager.confand make it look exactly like
[main]
plugins=ifupdown,keyfile
dhcp=internal

[ifupdown]
managed=true
Reboot the pi with
sudo rebootthen SSH back in.Install Docker with
curl -fsSL https://get.docker.com -o get-docker.sh && sh get-docker.shInstall git with
sudo apt install gitClone tuya-cloudcutter repo with
git clone https://github.com/tuya-cloudcutter/tuya-cloudcutter
Start the LibreTiny-ESPHome Docker Container
Currently LibreTiny it not merged into the main fork of ESPHome, so we have to install the LT version of it. Feel free to let the devs know in this PR if this fork works for you and vote to have it merged! https://github.com/esphome/esphome/pull/3509
Run the docker container to enable the ESPHome Dashboard with
sudo docker run -d -v /opt/esphome:/config:rw -v /etc/localtime:/etc/localtime:ro -p '6052:6052/tcp' --name libretiny-esphome ghcr.io/libretiny-eu/libretiny-esphome-docker:latestOpen a browser to your Raspberry Pi IP on port 6052. Example
http://192.168.1.9:6052This will allow you to build your ESPHome firmware for the device. The Globe Plug YAML is located on the Globe Night Light configuration page
Your Raspberry Pi is now ready to be used with Tuya-Cloudcutter and also functions as the LibreTiny ESPHome Dashboard to manage the devices until it is merged into the regular version of ESPHome.
To Run cloudcutter on the RPI use sudo ./tuya-cloudcutter.sh -r refer to the usage instructions
It will take a few minutes for the first initial run to pull down the files and build the docker container. Follow the on screen instructions to flash custom firmware and/or cloudcut the device. Refer to the video above for more in depth steps of this process or come join us in Discord for additional help using the link in the page footer below.
Install Libretuya ESPHome Fork ** NO LONGER NECESSARY
***STOP and READ! I've left this section for archive purposes but now the docker container is already built and ready for us (section above)
Clone the libretuya-esphome repo with
git clone https://github.com/kuba2k2/libretuya-esphomeChange to the libretuya folder with
cd libretuya-esphomeBuild the docker container with
sudo python3 docker/build.py --tag libretuya --arch armv7 --build-type docker buildif you are not using a Raspberry Pi, change the arch toamd64Change back to the home folder with
cd ..Run the docker container to enable the ESPHome Dashboard with
sudo docker run -d -v /opt/esphome:/config:rw -v /etc/localtime:/etc/localtime:ro -p '6052:6052/tcp' --name esphome-libretuya esphome/esphome-armv7:libretuya